多屏显示
本指南:在同一应用中多块屏幕展示地图,支持 多个 TnMapView 或 TnClusterMapView 两种实现方式。
功能介绍
多屏显示指在同一套导航应用中,于中控屏、副屏、仪表盘等多个区域同时展示地图。SDK 提供两种常见实现路径,可按 HMI 形态与能力需求选型:
效果示意:
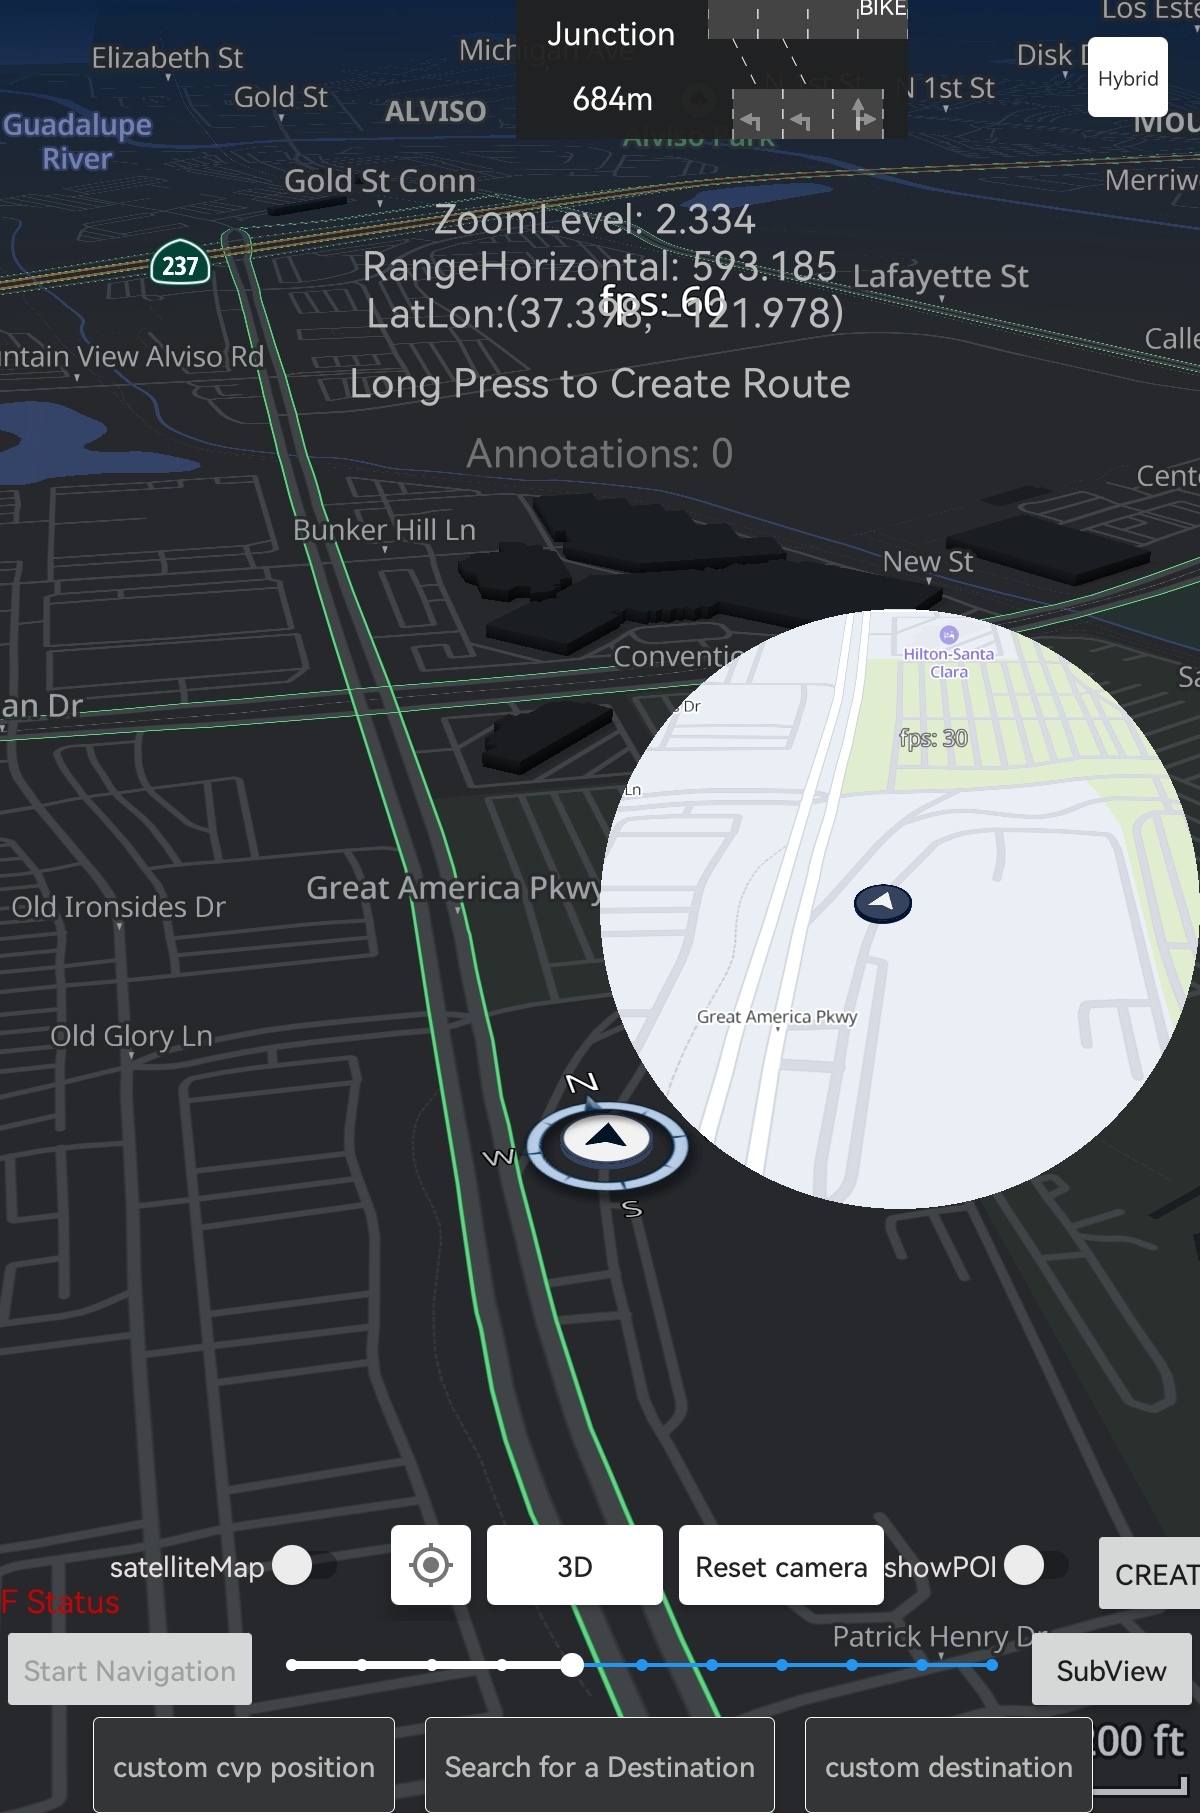
| 方案 |
实现类 |
典型场景 |
| 多个 MapView |
多个 TnMapView |
多块标准 Android 屏、分屏/画中画、需完整 MapView 能力(内置手势等) |
| Cluster 副屏 |
TnClusterMapView |
仪表盘、外接 Surface(TextureView / SurfaceView)、与中控分离渲染 |
路口放大图使用独立的 TnIntersectionView,见 路口放大图。
| 导航应用(示例)
├── 方案 A:主屏 TnMapView + 副屏 TnMapView → 各自 MapViewInitConfig
└── 方案 B:主屏 TnMapView + 仪表盘 TnClusterMapView → ClusterMapViewParams + Surface
↓
共享:定位、算路、导航状态 → 分别更新各实例 Controller(SDK 不自动同步)
|
方案选型
| 项 |
多个 TnMapView |
TnClusterMapView |
| 布局方式 |
XML 嵌入 <com.telenav.map.views.TnMapView> |
代码创建 + 外接 Surface |
| 初始化 |
MapViewInitConfig(见 快速开始) |
ClusterMapViewParams |
| Surface 生命周期 |
View 系统自动管理 |
须手动 转发 onSurfaceCreated/Changed/Destroyed |
| 控制器 API |
getCameraController() 等 |
cameraController() 等 |
| 手势 |
setActiveGestures、内置触摸监听 |
gestureProvider() / ClusterMapViewGestureBinder |
说明:多屏并不要求副屏一定使用 TnClusterMapView。若副屏同样是常规 Android View 布局,直接使用第二个 TnMapView 即可,集成方式与主屏相同。
方案一:多个 TnMapView
在布局中放置 多个 TnMapView,每个实例独立 initialize,即可实现多屏地图。适用于双屏导航、主屏+预览小窗、多 Fragment 各带地图等场景。
布局示例:
1
2
3
4
5
6
7
8
9
10
11
12 | <LinearLayout ...>
<com.telenav.map.views.TnMapView
android:id="@+id/main_map_view"
android:layout_width="0dp"
android:layout_height="match_parent"
android:layout_weight="1" />
<com.telenav.map.views.TnMapView
android:id="@+id/secondary_map_view"
android:layout_width="0dp"
android:layout_height="match_parent"
android:layout_weight="1" />
</LinearLayout>
|
初始化要点:
- 每个
TnMapView 单独调用 initialize(MapViewInitConfig),可在 viewOptions.stylePath 中为副屏指定不同 TSS(如 styles/cluster/newstyle.tss)。
- 各自在
onReady 中配置相机、CVP、路线等;API 与单屏一致,详见 快速开始 及各专题文档。
- 导航回调中须 分别 更新每个实例(见 多实例数据同步)。
 1
 2
 3
 4
 5
 6
 7
 8
 9
10
11
12
13
14
15
16
17
18
19 | private lateinit var mainMapView: TnMapView
private lateinit var secondaryMapView: TnMapView
override fun onViewCreated(view: View, savedInstanceState: Bundle?) {
mainMapView = view.findViewById(R.id.main_map_view)
secondaryMapView = view.findViewById(R.id.secondary_map_view)
mainMapView.initialize(buildMapConfig(stylePath = "styles/default/newstyle.tss") {
onMainMapReady(mainMapView)
})
secondaryMapView.initialize(buildMapConfig(stylePath = "styles/cluster/newstyle.tss") {
onSecondaryMapReady(secondaryMapView)
})
}
fun onLocationUpdated(location: Location) {
mainMapView.getVehicleController()?.setLocation(location)
secondaryMapView.getVehicleController()?.setLocation(location)
}
|
方案二:TnClusterMapView
当副屏通过 TextureView / SurfaceView 提供渲染表面(常见于仪表盘、嵌入式 Secondary Display)时,使用 TnClusterMapView 绑定外接 Surface,无需在布局中嵌入完整 TnMapView。
核心接口一览
| 分类 |
方法 |
说明 |
| 初始化 |
initialize(ClusterMapViewParams) |
Surface 可用后调用 |
| 生命周期 |
onSurfaceCreated/Changed/Destroyed |
Surface 事件转发 |
| 生命周期 |
onResume/onPause/onDestroy |
对齐 Activity |
| 控制器 |
cameraController() 等 |
onReady 之后可用 |
| 手势 |
gestureProvider() |
触摸 / 原始手势 |
| 其他 |
setFPS(fps) |
帧率,默认 30 |
| 其他 |
isFinishedLoading(mask) |
特性加载状态 |
接口详细说明
1. initialize — 初始化 Cluster 地图
| fun initialize(params: ClusterMapViewParams)
|
| 参数 |
类型 |
默认 |
说明 |
context |
Context |
必填 |
建议 applicationContext |
surface |
Surface |
必填 |
渲染目标;来自 TextureView(Surface(SurfaceTexture))或 SurfaceView(holder.surface) |
width / height |
Int |
0 |
逻辑尺寸(像素) |
density |
Float |
0f |
屏幕密度 |
defaultLocation |
LatLon |
— |
初始中心 |
createCVP |
Boolean |
true |
是否创建默认车辆图标 |
zoomLevel |
Float |
5f |
初始缩放 |
readyListener |
MapViewReadyListener<ClusterMapView?> |
空实现 |
就绪回调 |
autoZoomLevel |
AutoZoomLevel |
DEFAULT |
自动缩放幅度 |
viewOptions |
ViewOptions? |
null |
样式、日/夜等;副屏常用 styles/cluster/newstyle.tss |
初始化顺序:initialize(params) → onSurfaceCreated() → onReady 回调中配置 Controller。
2. Surface 来源与生命周期
ClusterMapViewParams.surface 可使用任意有效的 Android Surface,常见两种来源:
| 来源 |
获取方式 |
说明 |
TextureView |
Surface(surfaceTexture) |
灵活叠层、支持动画与透明度;可与 ClusterMapViewGestureBinder 绑定手势 |
SurfaceView |
surfaceView.holder.surface |
独立 Surface 层,性能稳定;通过 SurfaceHolder.Callback 管理生命周期 |
无论哪种 View,都须将 SurfaceHolder / SurfaceTexture 的创建、变更、销毁事件 转发 给 TnClusterMapView 对应方法,并配合 Activity 的 onResume / onPause / onDestroy。
| 方法 |
调用时机 |
onSurfaceCreated() |
Surface 首次可用 |
onSurfaceChanged(width, height) |
尺寸变化 |
onSurfaceChanged(surface, w, h) |
Surface 对象与尺寸均变化 |
onSurfaceDestroyed() |
Surface 销毁 |
onResume() / onPause() / onDestroy() |
对齐 Activity 生命周期 |
TextureView 时序:
| onSurfaceTextureAvailable
→ Surface(texture) → initialize(params) → onSurfaceCreated() → onReady
onSurfaceTextureSizeChanged → onSurfaceChanged(w, h)
onSurfaceTextureDestroyed → onSurfaceDestroyed() → onDestroy()
|
SurfaceView 时序:
| surfaceCreated
→ initialize(params)(surface = holder.surface)→ onSurfaceCreated() → onReady
surfaceChanged → onSurfaceChanged(w, h)
surfaceDestroyed → onSurfaceDestroyed() → onDestroy()
|
3. 手势(MapGestureProvider)
| 方法 |
适用平台 |
说明 |
motionEventGesture().onTouchEvent(event) |
Android 触摸屏 |
转发 MotionEvent |
TextureView:可使用 ClusterMapViewGestureBinder 自动转发触摸:
| ClusterMapViewGestureBinder.bind(textureView, clusterMapView)
// 销毁时
ClusterMapViewGestureBinder.unbind(textureView)
|
SurfaceView:在 View 的 onTouchEvent 或 setOnTouchListener 中手动转发:
| surfaceView.setOnTouchListener { _, event ->
clusterMapView?.gestureProvider()?.motionEventGesture()?.onTouchEvent(event)
true
}
|
TnClusterMapView 同时支持 setOnAnnotationTouchListener、setOnRouteTouchListener 等,用法同 触摸与手势。
多实例数据同步
无论采用 多个 TnMapView 还是 TnMapView + TnClusterMapView,SDK 不会 自动跨屏同步车辆位置、路线与图层状态,须在业务层统一广播:
| fun updateAllScreens(location: Location) {
mainMapView.getVehicleController()?.setLocation(location)
secondaryMapView.getVehicleController()?.setLocation(location) // 方案一
clusterMapView?.vehicleController()?.setLocation(location) // 方案二
}
|
路线、标注、特性开关、updateRouteProgress 等同理,在导航或定位回调中分别调用各实例对应 Controller。
集成示例(TnClusterMapView)
TextureView
 1
 2
 3
 4
 5
 6
 7
 8
 9
10
11
12
13
14
15
16
17
18
19
20
21
22
23
24
25
26
27
28
29
30
31
32
33
34
35
36
37
38
39
40
41
42
43
44
45
46
47
48
49
50
51
52
53
54
55
56
57
58
59
60
61
62
63
64
65
66
67
68
69
70
71
72 | class ClusterMapHelper(
private val textureView: TextureView,
private val context: Context
) {
private var clusterMapView: TnClusterMapView? = null
private var clusterSurface: Surface? = null
fun start(initial: LatLon) {
textureView.surfaceTextureListener = object : TextureView.SurfaceTextureListener {
override fun onSurfaceTextureAvailable(st: SurfaceTexture, width: Int, height: Int) {
clusterSurface = Surface(st)
clusterMapView = TnClusterMapView().apply {
initialize(
ClusterMapViewParams(
context = context.applicationContext,
surface = clusterSurface!!,
width = width,
height = height,
density = context.resources.displayMetrics.density,
defaultLocation = initial,
createCVP = true,
viewOptions = ViewOptions(
stylePath = "styles/cluster/newstyle.tss"
),
readyListener = object : MapViewReadyListener<ClusterMapView?> {
override fun onReady(view: ClusterMapView?) {
view ?: return
view.cameraController()?.apply {
renderMode = Camera.RenderMode.M3D
enableFollowVehicleMode(
Camera.FollowVehicleMode.HeadingUp,
useAutoZoom = true
)
}
view.featuresController().traffic().setEnabled()
}
override fun getReadyFeaturesMask() =
ClusterMapView.eFeatureCategory_Vital
}
)
)
onSurfaceCreated()
}
ClusterMapViewGestureBinder.bind(textureView, clusterMapView!!)
}
override fun onSurfaceTextureSizeChanged(st: SurfaceTexture, w: Int, h: Int) {
clusterMapView?.onSurfaceChanged(w, h)
}
override fun onSurfaceTextureDestroyed(st: SurfaceTexture): Boolean {
ClusterMapViewGestureBinder.unbind(textureView)
clusterMapView?.onSurfaceDestroyed()
clusterSurface = null
return true
}
override fun onSurfaceTextureUpdated(st: SurfaceTexture) {}
}
}
fun onResume() { clusterMapView?.onResume() }
fun onPause() { clusterMapView?.onPause() }
fun onDestroy() {
clusterMapView?.onDestroy()
clusterMapView = null
}
fun updateVehicle(location: Location) {
clusterMapView?.vehicleController()?.setLocation(location)
}
}
|
SurfaceView
1
2
3
4
5
6
7
8
9
10
11
12
13
14
15
16
17
18
19
20
21
22
23
24
25
26
27
28
29
30
31
32
33
34
35
36
37
38
39
40
41
42
43
44
45
46
47
48
49
50
51 | class ClusterSurfaceViewHelper(
private val surfaceView: SurfaceView,
private val context: Context
) {
private var clusterMapView: TnClusterMapView? = null
fun start(initial: LatLon) {
surfaceView.holder.addCallback(object : SurfaceHolder.Callback {
override fun surfaceCreated(holder: SurfaceHolder) {
if (clusterMapView == null) {
clusterMapView = TnClusterMapView().apply {
initialize(
ClusterMapViewParams(
context = context.applicationContext,
surface = holder.surface,
width = surfaceView.width,
height = surfaceView.height,
density = context.resources.displayMetrics.density,
defaultLocation = initial,
viewOptions = ViewOptions(
stylePath = "styles/cluster/newstyle.tss"
)
)
)
}
}
clusterMapView?.onSurfaceCreated()
}
override fun surfaceChanged(holder: SurfaceHolder, format: Int, w: Int, h: Int) {
clusterMapView?.onSurfaceChanged(w, h)
}
override fun surfaceDestroyed(holder: SurfaceHolder) {
clusterMapView?.onSurfaceDestroyed()
}
})
surfaceView.setOnTouchListener { _, event ->
    clusterMapView?.gestureProvider()?.motionEventGesture()?.onTouchEvent(event)
    true
}
}
fun onResume() { clusterMapView?.onResume() }
fun onPause() { clusterMapView?.onPause() }
fun onDestroy() {
clusterMapView?.onDestroy()
clusterMapView = null
}
}
|
注意事项
通用(含多个 TnMapView)
- 每个
TnMapView / TnClusterMapView 均为 独立实例,数据与 Controller 须分别更新。
- 各屏可使用不同
stylePath,见 地图配色方案。
Controller 须在对应实例 onReady 之后访问。
TnClusterMapView 专用
- 初始化顺序:先
initialize,再 onSurfaceCreated();销毁时先 onSurfaceDestroyed(),最后 onDestroy()。
- Surface 来源:
TextureView 与 SurfaceView 二选一,生命周期回调须与所用 View 一致。
相关指南